
Weeks 11 and 12: Sausage jokes
Or, that time when my sense of humor reverted back to that of a 12 year old boy.
After the chaos of family meal, it was time to switch gears to charcuterie, slated to take up the second ten days of Level 3. You read that right: ten days of charcuterie. And I’m not referring to the art of arranging flowing rivers of salami and mountains of cheese on rustic wooden boards for your dinner party guests. We’re talking soup to nuts, or nose to tail in this situation: sausages, smoked meats, pates, mousses, and the like, made from scratch.
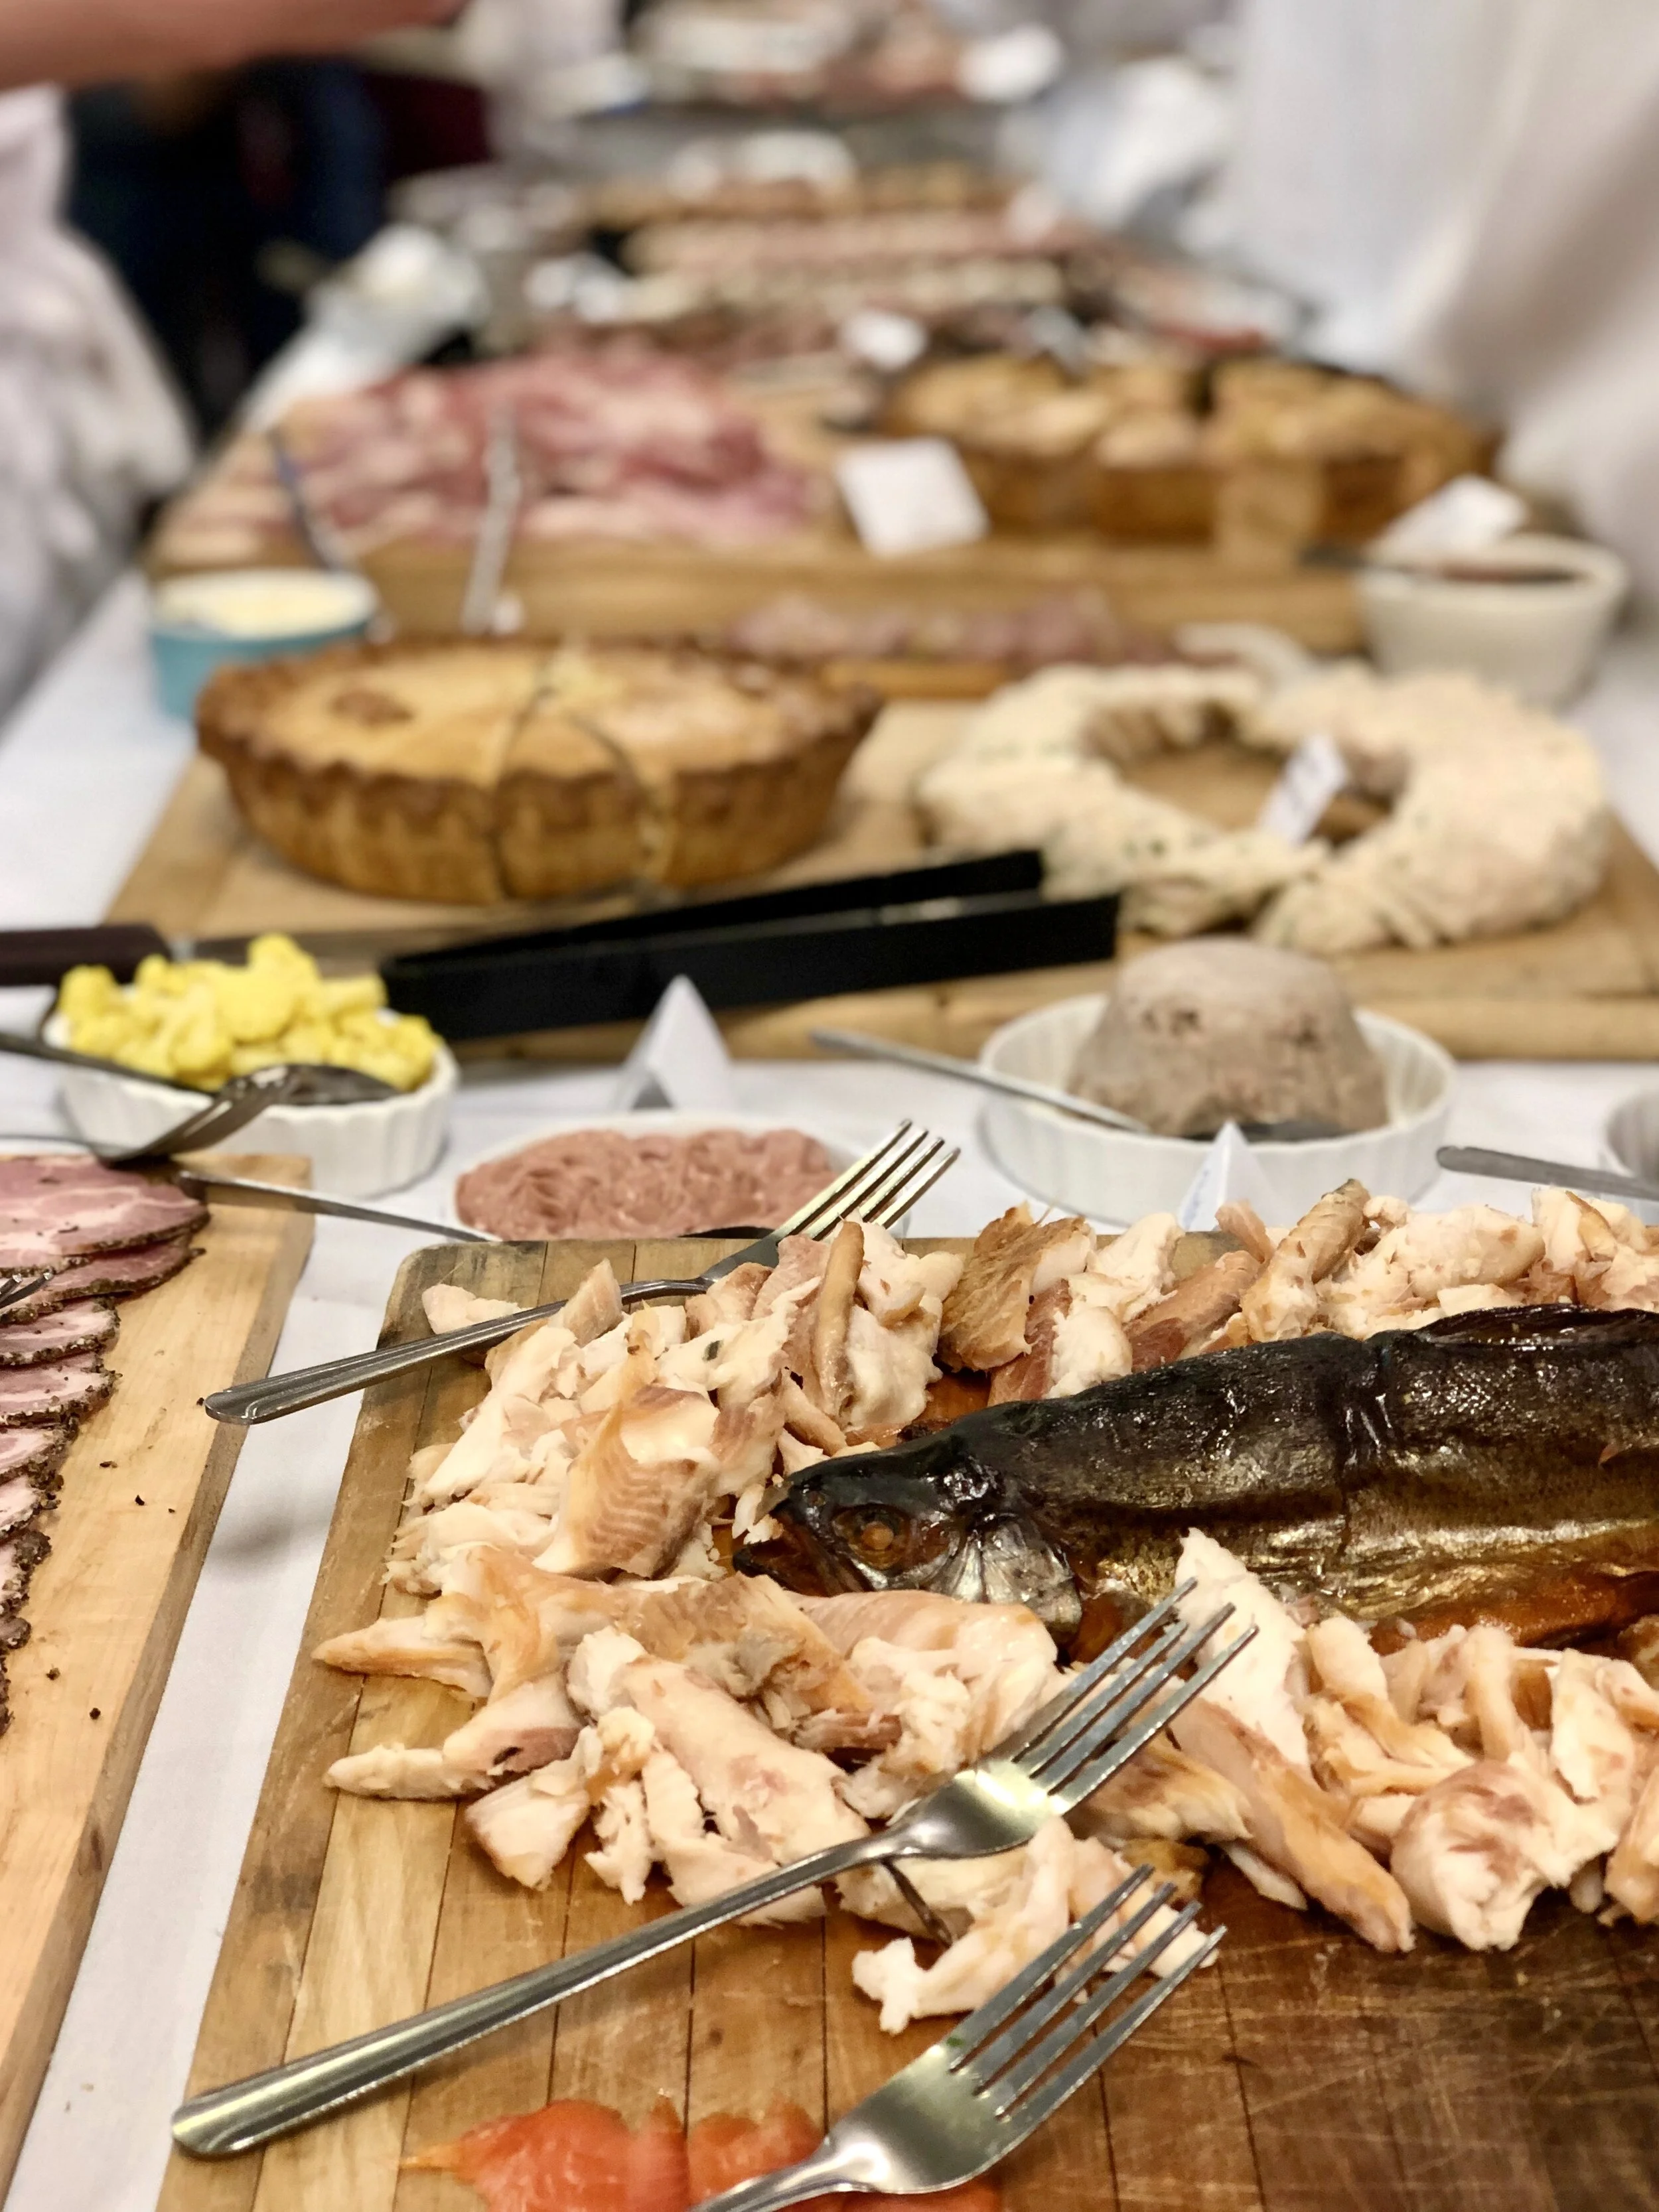
Below, scenes from our class’s final charcuterie buffet.


I’m not going to lie: even though I love to eat prosciutto and foie gras terrine, charcuterie was the topic I was least excited about in our entire curriculum. Ten days is a long time to spend grinding up offal and pumping it into wet sheep intestines. What’s more, we were back under the supervision of one of our instructors from Level 1, whose approach can occasionally remind one of an army drill sergeant (now you know why I was so stressed all the time in my first few weeks). But it ended up being an incredibly cool and unique experience, one that I probably won’t get the chance to replicate in the future given the specialization of the tools and ingredients needed to make these wonderful foods. I also learned that Commander Chef is a softie deep down, and his passion for meat fabrication is contagious.

We made it in the end!
A day in the life
Backing up for a moment, I’ll tell you about how charcuterie works as a module. Setting wise, you’re in the same kitchen as family meal, but on the opposite side, with access to machinery you need like a sausage maker, meat grinder, cold smoker, and more. Your key tool is your boning knife which is used to break down meat — you’ll definitely use this multiple times a day. Get ready to be literally elbows deep in raw meat for a good part of your day.

The charcuterie side of the kitchen (family meal happens on the other side).

The combi-oven and cold smoker, essential machines for charcuterie.
Every day, you work on at least two projects, which often continue into the following days, as charcuterie can be a multi-day process. An average day might look like the following:
Review your agenda: On the docket are smoked lamb sausages, chicken liver mousse, and pork terrine, time permitting. Chef says sausages need to go first.
Sausage prep: Begin by cutting up your lamb meat and fat into 2 inch strips and put it in the freezer to chill. Meat needs to be very cold when you grind it, or else it could get mushy and clog up the machine.
Mousse prep: Rinse the blood from the chicken livers, clean them of any grit or sinew, rinse them again, and set them aside for later. Make sure to wrap them well and label them with your name in the fridge so that no one else takes them by accident.
Get started on sausages: Assemble the meat grinder, pull the lamb out of the freezer, run it through the grinder, and place it back in the freezer. Disassemble and rinse out the grinder. Gather any sort of additional ingredients you might need, like herbs, aromatics, or seasonings. Set those aside. Reassemble the grinder and run the lamb meat through it again, grinding it more finely this time, and mix it together with your add-ins in a giant stand mixer. Let that rest in the fridge for an hour or two to let the flavors meld. Clean and sanitize the meat grinder.
Move on to the mousse: Gather the livers from the fridge, measure out your cream, brandy, anti-oxidizing acids, salts, etc. Mix that all together in a blender, and put it in the fridge to set.
Back to the sausages: Pull out your lamb mixture and load it into the sausages press. Crank the lever to fill up a 10 foot long sausage casing. Tie off your sausages, put them in a large hotel pan and cover, saving them for tomorrow.
Prep for a new project the next day: Break down a 10 lb piece of pork belly into strips for you to use on a terrine tomorrow.
The next day: Smoke your sausages and put your mousse in the steamer at the same time. Sanitize and assemble the meat grinder and pull out your pork for your terrine...
And so on and so forth. Do you have a headache just reading that? Imagine — you’re living that every day!

Me with my new best friend, the meat grinder.
As you can tell, there’s a LOT of multi-tasking. What’s more, your classmates are all working on different types of charcuterie projects from your own, so the kitchen can become a bit chaotic, with a minimum of 15 different items in the works on any given day. For homework, you fill in a spreadsheet with each item you worked on that day, the steps you took, and what needs to happen next so that you don’t drop the (meat)ball on anything. Chef checks on this every few days to make sure you’re up to date. This continues for nine days, and on the final day the class puts together a giant buffet of the 60+ finished items for the entire school to try. Finally, you can put together those flowing rivers of salami of your dreams.
Below: my homework was to fill in a spreadsheet every night with my activities for each of my projects

Now that you know how it works, I’ll dive into my personal experience with charcuterie, since by now you know that I have a lot of emotions that spike and subside on a daily basis. Then I will present a quick charcuterie science primer to contextualize all the delicious things I made, which you’ll learn about too!
Drama behind the scenes
To put it bluntly, charcuterie did not start off on a great note. First, we learned that we weren’t allowed to help each other with our projects, which was a vast departure from all the partnering and teamwork we had done to date. Just like pastry, charcuterie is a precise science, requiring an array of salts and acids to ensure the meat develops the right flavors, textures, and preservative qualities. If you make a mistake in the amount of curing salt you add to some sausage meat, you could make someone very sick, either from overdoing it on the salt, which is toxic in large quantities, or underdoing it, which would result in unintended (and dangerous) bacterial growth. Apparently, some of the previous classes had been measuring salts for each other and getting the measurements wrong, so we were instructed that we were on our own. Any mistakes we made were our mistakes and ours alone, and no one could come to our rescue if we fell behind.

One girl in my class worked on a Jambon Blanc, a type of French cooked ham.

The only person who could help her was our Chef - here they are about to press it flat.

It takes a lot of muscle!

The final product before cooking.
Given this change of pace, everyone was on edge as we embarked on our journey into the underworld of meat processing. On day 1, a few of us were getting started on a duck, foie gras and truffle pâté by breaking down duck carcasses to gather our ingredients of legs, thighs, hearts and livers. That was when the drama began. All of a sudden, I saw that one person was taking our “every man for himself” instructions to heart when he decided it was time to branch off and work on assembling his pâté, rather than continuing to carve the excess meat off the carcasses for the rest of us to use. He grabbed the beautiful leg meat that we had already separated and left the rest of us to finish our group hacking session. That meant that I was not only stuck with mostly hearts and livers for my pâté, but that I was also running late on putting my ingredients together and at risk of getting chastised for falling behind.
I’m not big on confrontation, but I was pretty frustrated. I saw my classmate go into a different room and, out of character, I decided to follow and call him out on not being a team player. He pushed back, telling me it was my fault for falling behind. Some more accusations were lobbed, and it ended up turning into a shouting match — over a duck! At the end of the day, I ended up crying in the locker room because the whole thing felt so awful. Rock bottom, culinary school style. In retrospect, I think there had been a miscommunication between Chef and the group, where my classmate thought he said it was time for the pâté group to move on and let everyone else finish up, while I was under the impression that the whole group needed to finish before we could start on our individual work. There’s no way to know the truth. Fortunately, the conflict blew over within a day or so.

Here, the duck and foie gras terrine all broken up…just like my heart the day I started it.
The second bad omen occurred the same day, when I was already not in the best place mentally. We were observing a demonstration on how to cure bacon, and Chef was showing us the first step of injecting a brine (a salt solution) into the center of a pork belly, using a foot-long hypodermic needle. Given that there were mammoth needles in play, everything was going surprisingly smoothly at first. Then, the needle unexpectedly pierced through the other side of the hunk of meat as Chef was injecting the liquid, and all of a sudden, I felt an unwelcome splash in the face: I had been squirted head-on with the brine! Standing in a tight crowd of 12 students, I was the lucky one to get hit. I was in shock, and so were all my classmates who were staring at me to see how I would react. Then Chef broke the silence: “Did it get in your eyes?” “No, Chef,” I said. “That’s why people wear goggles in meat processing plants.” No apology! Needless to say, I was not excited about where this module was going.
Moments before I got squirted in the face with bacon brine!!!
After my rocky start, it took a few days to get into the charcuterie groove. I learned that as long as I could remember a few key principles, though, I would be just fine. If you just want to learn about the delicious items that I made and aren’t as keen on the science behind them, skip this next little section and go straight to “the good stuff”.
Charcuterie Science 101

Charcuterie Principle 1: Temperature
Whereas most of my culinary training to date had focused on applications of heat, I learned that it's cold that’s integral to success in making charcuterie. This plays out in a few contexts:
Temperature for food safety: You must keep the meat either on ice, in the refrigerator, or in the freezer at all times, unless you're manipulating it, like mixing or grinding. As long as you keep the meat below 41° F, you can control the development of harmful microorganisms. This is key when you’re making a meat product that’s supposed be safe (and delicious) to eat for weeks, if not months or years.
Temperature for food processing: Additionally, the meat needs to be incredibly cold, ideally frozen, in order to grind it effectively. Imagine a piece of meat coming out of the freezer versus a piece that has been sitting out of the fridge on the counter for an hour. One is hard, and the other is soft. Following so far? Now think about what would happen if you put that meat into a food processor. The frozen meat, which is like a lump of ice, would break down into littler lumps of ice. The warm meat would turn into a paste. And that is exactly what happens in the meat grinder. If your meat is nice and cold, it will pass through the grinder easily, starting as big pieces and ending up in smaller pieces suitable for a patty or a sausage. If it’s even a little bit too warm, it will smear, which is a technical term that means exactly what it sounds like - smush and spread out all over the inside of the grinder, clogging it up and ruining all the meat. There’s not much you can do with smeared meat other than cook it and feed it to your dog. For the same reason, all parts of the grinder itself are kept chilled separately until right before grinding the meat, when the freezing grinder is reassembled.
Photo credit: Food52

Charcuterie Principle 2: Salt
Of course, salt is one of the best tools in our arsenal to bring out flavor in food. In charcuterie it does that, and so much more.
Salt for flavor: Per above, salt provides necessary seasoning to bring out the flavors of your meat and other ingredients, and certain types of salt also add that specific umami “cured” flavor sought out in sausages and the like.
Salt for food safety: Salt draws out moisture in food, which is a bad thing for harmful bacteria and other microorganisms that thrive in a moist environment. Adding salt to your charcuterie, along with keeping the meat cold while making it, will make it much more unlikely that your food will make someone sick.
Salt for color: Nitrates, a type of salt, are responsible for enhancing that beautiful red color you associate with cured meats. Without nitrates, the meat would look gray and dull.
Salt for texture: When you bite into a sausage, what texture do you want? Do you prefer something springy and dense, or soft and mushy? Most of us would say the former - it’s hard not to love a snappy hot dog or a sliceable salami. Well, salt is a key component of achieving that texture in ground meats: it facilitates binding, which how ground meat sticks to itself and forms a dense mass. Just like you would use eggs and breadcrumbs to bind a meatloaf to keep it from falling apart, salt, in conjunction with agitation (see below), does the same thing.
Photo credit: Con Yeager Spice Company

Charcuterie Principle 3: Agitation
By agitation, I’m not talking about that antsy feeling of not being able to look at your phone for hours since you constantly have raw meat on your hands — though that struggle is real too, I can tell you from experience. Agitation in cooking means that you’re jostling the ingredient around in some form, which causes chemical and structural changes within it. Examples of agitation are boiling and whipping, which change the texture of your ingredients in question. In the context of charcuterie, our main forms of agitation were grinding and mixing.
To quickly explain the chemistry, there’s a protein present in meat called myosin, which helps muscles contract and exert strength during life. Once the animal is harvested and broken down, that myosin doesn’t go away. Rather, when you grind and/or mix meat, that myosin gets released and helps glue it all together, especially in conjunction with salt. You can tell that the myosin is coming out when the texture of the meat becomes sticky. This is called binding, and it’s especially noticeable with a stand mixer on high.
Agitation the exact reason that you don’t want to overmix hamburger meat. With hamburgers, the textural goal is juicy tenderness, so you should leave the meat alone as much as possible, minimizing the expression of myosin. It’s kind of like developing gluten through kneading dough in pastry or pasta making; for pastry, when you want a pie crust to be light and soft, you knead the dough as little as possible so that the gluten doesn’t have the chance to develop, which would make the dough tough. On the flip side, you want that nice elastic stretchiness and density in pasta that comes from gluten development, so you knead the dough a lot. Same goes with meat. Make sense?
Alright, enough of the science...now onto the food!
The good stuff
Duck and foie gras terrine with truffles and pistachios

Also known as the duck drama terrine. You saw a picture of this earlier in this post. As above, we started by breaking down ducks to separate out their legs, hearts, livers, and gizzards, which we ground up into a homogenous mixture along with cooked garlic, shallots, brandy and other seasoning. This was my first experience using the meat grinder, and it did not go well. I accidentally smeared the meat twice before I got the hang of the machine. The first time, I unwittingly left out a small but essential piece when assembling the grinder (the gasket), and the second time I didn’t tighten the grinding element onto the the machine enough. It takes a lot of strength! The good thing about messing up early was that I never did it again.
After grinding the meat, we got fancy, combining it with cubes of foie gras, truffle slices, and toasted pistachios. Then, we formed the meat into patties and slammed them down into the terrine mold (basically a loaf pan) to get any air out of them, filling the mold up halfway. Apparently this slamming method is a formal technique, though I don’t know the French name. It was quite cathartic. After that, we layered in a beautiful whole duck breast, and then slammed the rest of the ground mixture on top to fill the remainder of the terrine. Finally, we covered the top of this Frankenstein mixture in sheets of fatty duck skin to keep it from oxidizing while it baked in the oven.
The finishing touch after baking was pouring aspic (meat jello) all over the mixture to seal it, hold it together, and again, keep it from oxidizing into a gross grey mass. I made the aspic by mixing homemade duck stock with gelatin. When warm, aspic is a liquid, but once it comes down to room temperature it sets exactly like jello. Doesn’t sound especially appealing — and not my personal favorite item that I made — but it does serve a useful purpose in preserving the shape, attractiveness and flavor of the terrine, and it doesn’t taste like much. At the end, the terrine was wonderful and very impressive, if I do say so myself.

First, we trimmed and ground our duck meat (legs, liver, hearts and gizzards) and seasoning.

After mixing in pistachios, foie, truffles, and seasoning, we filled the terrine mold and baked it.

We covered the terrine in aspic, otherwise known as meat jello, to keep it from turning grey.

Finally, we served it on the buffet!
Chicken and duck liver mousse with foie gras, brandy and cream
One of life’s simple pleasures is an unctuous, creamy chicken liver mousse to spread on some beautiful crusty bread. This one was pretty easy and even more delicious. After cleaning off the grit and sinew from chicken and duck livers and giving them a good rinse, I whizzed them in the blender with cubes of foie gras, curing salts and preservatives, eggs, milk, and brandy-flambéed garlic and shallots. Once that mixture was silky smooth, I stirred in some cream, as if it weren’t rich enough. That steamed in the combi-oven and then rested until it hit 165° F, the temperature that poultry must be cooked to to be considered safe to eat. Finally, I let it set in the fridge. That’s it! I love liver mousse on its own and also as a condiment on a sandwich. Basically a meaty mayo — what’s not to like?

Chocolate or liver mousse in the making?

Throughout charcuterie we were able to taste everyone’s creations. My mousse is at the bottom middle of this tray, unlabeled.
Smoked lamb and rosemary sausage

Unfortunately I wasn’t able to get to this one before it got eaten at the buffet - that’s what was left of it! I guess that’s a good thing?
If you thought the duck terrine was a saga, wait until you read my novella about this one! I was pumped (pun intended) about this project because I love Greek food, and this one screamed Greek to me. Also, I hadn’t yet made a sausage, so I was eager to learn a new skill that I had seen some of my classmates already picking up.
Normally, you want a good amount of fat in a sausage for flavor, moisture, and binding, but lamb fat can be greasy and unpleasant tasting. So, the first step here was to trim the lamb of thick striations of fat before grinding it, leaving just the requisite amount to achieve the right texture and flavor. Then, as always, I cut the meat into pieces that would fit easily into the grinder, popped it all in the freezer, and passed it through the cold grinder twice to achieve the right size pieces. The final step for the meat mixture was to use a large stand mixer to combine it with salts and seasoning, a small mountain of minced garlic, and bowl of rosemary that was chopped “so finely that you could snort it” — Chef’s orders. I let the mixer do its work until the mixture became sticky, that characteristic texture when the myosin has developed enough to create that necessary bind, as we learned in Charcuterie Science 101 above.
After that came the amusing part, which was the sausage stuffing process. *If you are easily offended, please move on to the mushroom and truffle pork sausage up next.*
OK: bottom line, I found sausage stuffing to be both uncomfortable and hilarious, and I think I maintained a constant blush from start to finish. Here’s how it goes:
First, you fill the machine’s main chamber up with your meat mixture and roll a moistened animal casing onto a tube protruding from its base.
Next, while you’re holding the wet-casing-covered tube in one hand, you use your other hand to manually crank the meat into the casing until it swells up and begins to grow off the end of the tube. While doing this, you want to make sure you don’t let go of the crank mid-air, which would cause it to swing backwards and smack you in the face. This would hurt and also be very embarrassing, given that the brand name of the school’s sausage machine is truly on theme (see picture below for details).

This is basically the machine we used in class. Note the unmissable brand name across the top. No joke.

Sausage casings, pre-stuffing. I think these were made of lamb intestines. They turned translucent when wet.
While continuing to crank, you gently guide the growing sausage into a spiral shape until all the meat has been pumped out of the main chamber and you have a long coil.
Then, you use a tool called a “sausage prick” — basically a little fork — to poke holes in the sausage so that air can escape and the sausages don’t explode when being tied off or cooked. I kid you not. When Chef told me to grab his sausage prick, it took all of my self-control to keep a straight face and respond “Yes, Chef!” I then realized I had no idea what or where this sausage prick was, so I had to run around to half of my classmates asking, “Where is Chef’s sausage prick?? And what does it do??”

I could easily feed 30 people with this length of sausage.

The notorious sausage prick.
Finally, you tie off the hulking coil into individual 8-inch sausages, keeping in mind Chef’s valuable advice, in case you mess up: “Tying off sausages is like a bad relationship. Don’t spend too much time trying to fix it when things go wrong. Just leave it and move on.” If only I had gone to culinary school at age 20 – it would have saved me some heartache for sure!
Some of my sausages did end up breaking and squirting out their filling, but I didn’t despair: that meant I had a good chunk of spare sausage meat to take home and cook up for dinner that night. I ended up making lamb burgers with Greek salad, feta and tzatziki. Beyond being a delicious meal, it was nice to be able to try my sausage at home because I got to taste the meat before smoking it, which was going to change the flavor significantly. I also experienced firsthand the effects of all our agitation of the meat, plus the addition of curing salt: the meat was not a burger consistency at all; it was much more dense and chewy, and it had that unmistakable tangy aftertaste of cured meat. I also noticed how bright red the meat became both on the inside and outside after cooking because of the nitrates — remember, per Charcuterie Science 101, nitrates help to enhance red color in meat. And it was VERY salty. All in all, it was definitely more suited to a sausage than a burger, but we still enjoyed it. With all that garlic and rosemary, how could you not?

My tied-off sausage links. Not terrible for a first try!

Dinner at home with the spare meat: lamb patty, greek salad, feta and tzatziki. Yum!
To wrap it up the next day, I cold-smoked the sausages, which means exposing them to smoke at a temperature below 100° F for a long period of time, to add a new dimension of flavor, and then cooked them in the combi-oven on high humidity until they reached a safe temperature to eat. The last step was to let them cool and dry out in the walk-in and then store them for our buffet the following week, when they would be served hot. At the end, they were, as you might imagine, lamby, smoky, and tangy. I preferred them without the smoke, but I had never tasted anything like them! I was happy to have made them.
Mushroom and truffle pork sausage

Anyone who knows me knows that I’m a sucker for truffles, so when Chef gave me this sausage recipe as an option for my next project, I jumped at the opportunity. The process was similar to the lamb sausage above: first, trimming, cutting and grinding the very cold meat; mixing it with seasonings and any other ingredients until the meat got sticky; and stuffing it into casings before cooking. The main difference was that the casings were about 4x larger than the lamb sausages, about as wide as my hand when filled, and they were made from a synthetic, inedible material that needed to be peeled off before slicing.
Pork was the meat of choice, mixed with roasted mushrooms and truffle slices, as well as the requisite curing salts and other seasonings. Everything was going swimmingly up until the mixing part. I had figured out the grinder; I hadn’t burned my mushrooms; and all my salts were measured properly. Then, the mixing happened.
Normally, when you want a sausage to be so dense that holds together in nice thin slices, you’ll mix the meat in a stand mixer, since it takes a lot of agitation for the myosin to come out and facilitate that binding process. The morning I came in to do the mixing, the stand mixer was already occupied, so Chef had me get started mixing the meat by hand. No problem, I thought to myself. Turns out, when meat has been sitting overnight on the top shelf of a fridge, right by the cooling element, it gets REALLY cold. Like 36°F. Sounds obvious, right? Well, when you’re mixing it with your bare hands, it takes on a new meaning: frostbite. When the stand mixer finally freed up and I went to wash my hands, they were so cold and numb that submerging them in cool water felt like I was playing catch with a sea urchin that had been doused in gasoline and then lit on fire. The worst part was that I had barely made a dent in getting that sticky texture, but the mixer got done in about 1 minute flat. First the bacon facial, and then this? I think I was being hazed.

The casings were quite large this time. For scale, that pan is 12 inches wide and 20 inches long. These were not your hot dog’s casings.

My sausage components, right before I almost got frostbite from mixing it all together by hand.
Fortunately, it was all smooth sailing from there. The stuffing was a breeze, and there was no smoking needed: these were simply cooked until they were safe to eat. Finally, I cooled them in the fridge, and sliced them on a meat slicer the day of the buffet to get perfectly thin and beautiful rounds.

The sausages were about 5 inches in diameter once filled.

Trussed and compared to my hand for scale

Ready to go! Clearly I wasn’t too phased by the frostbite.
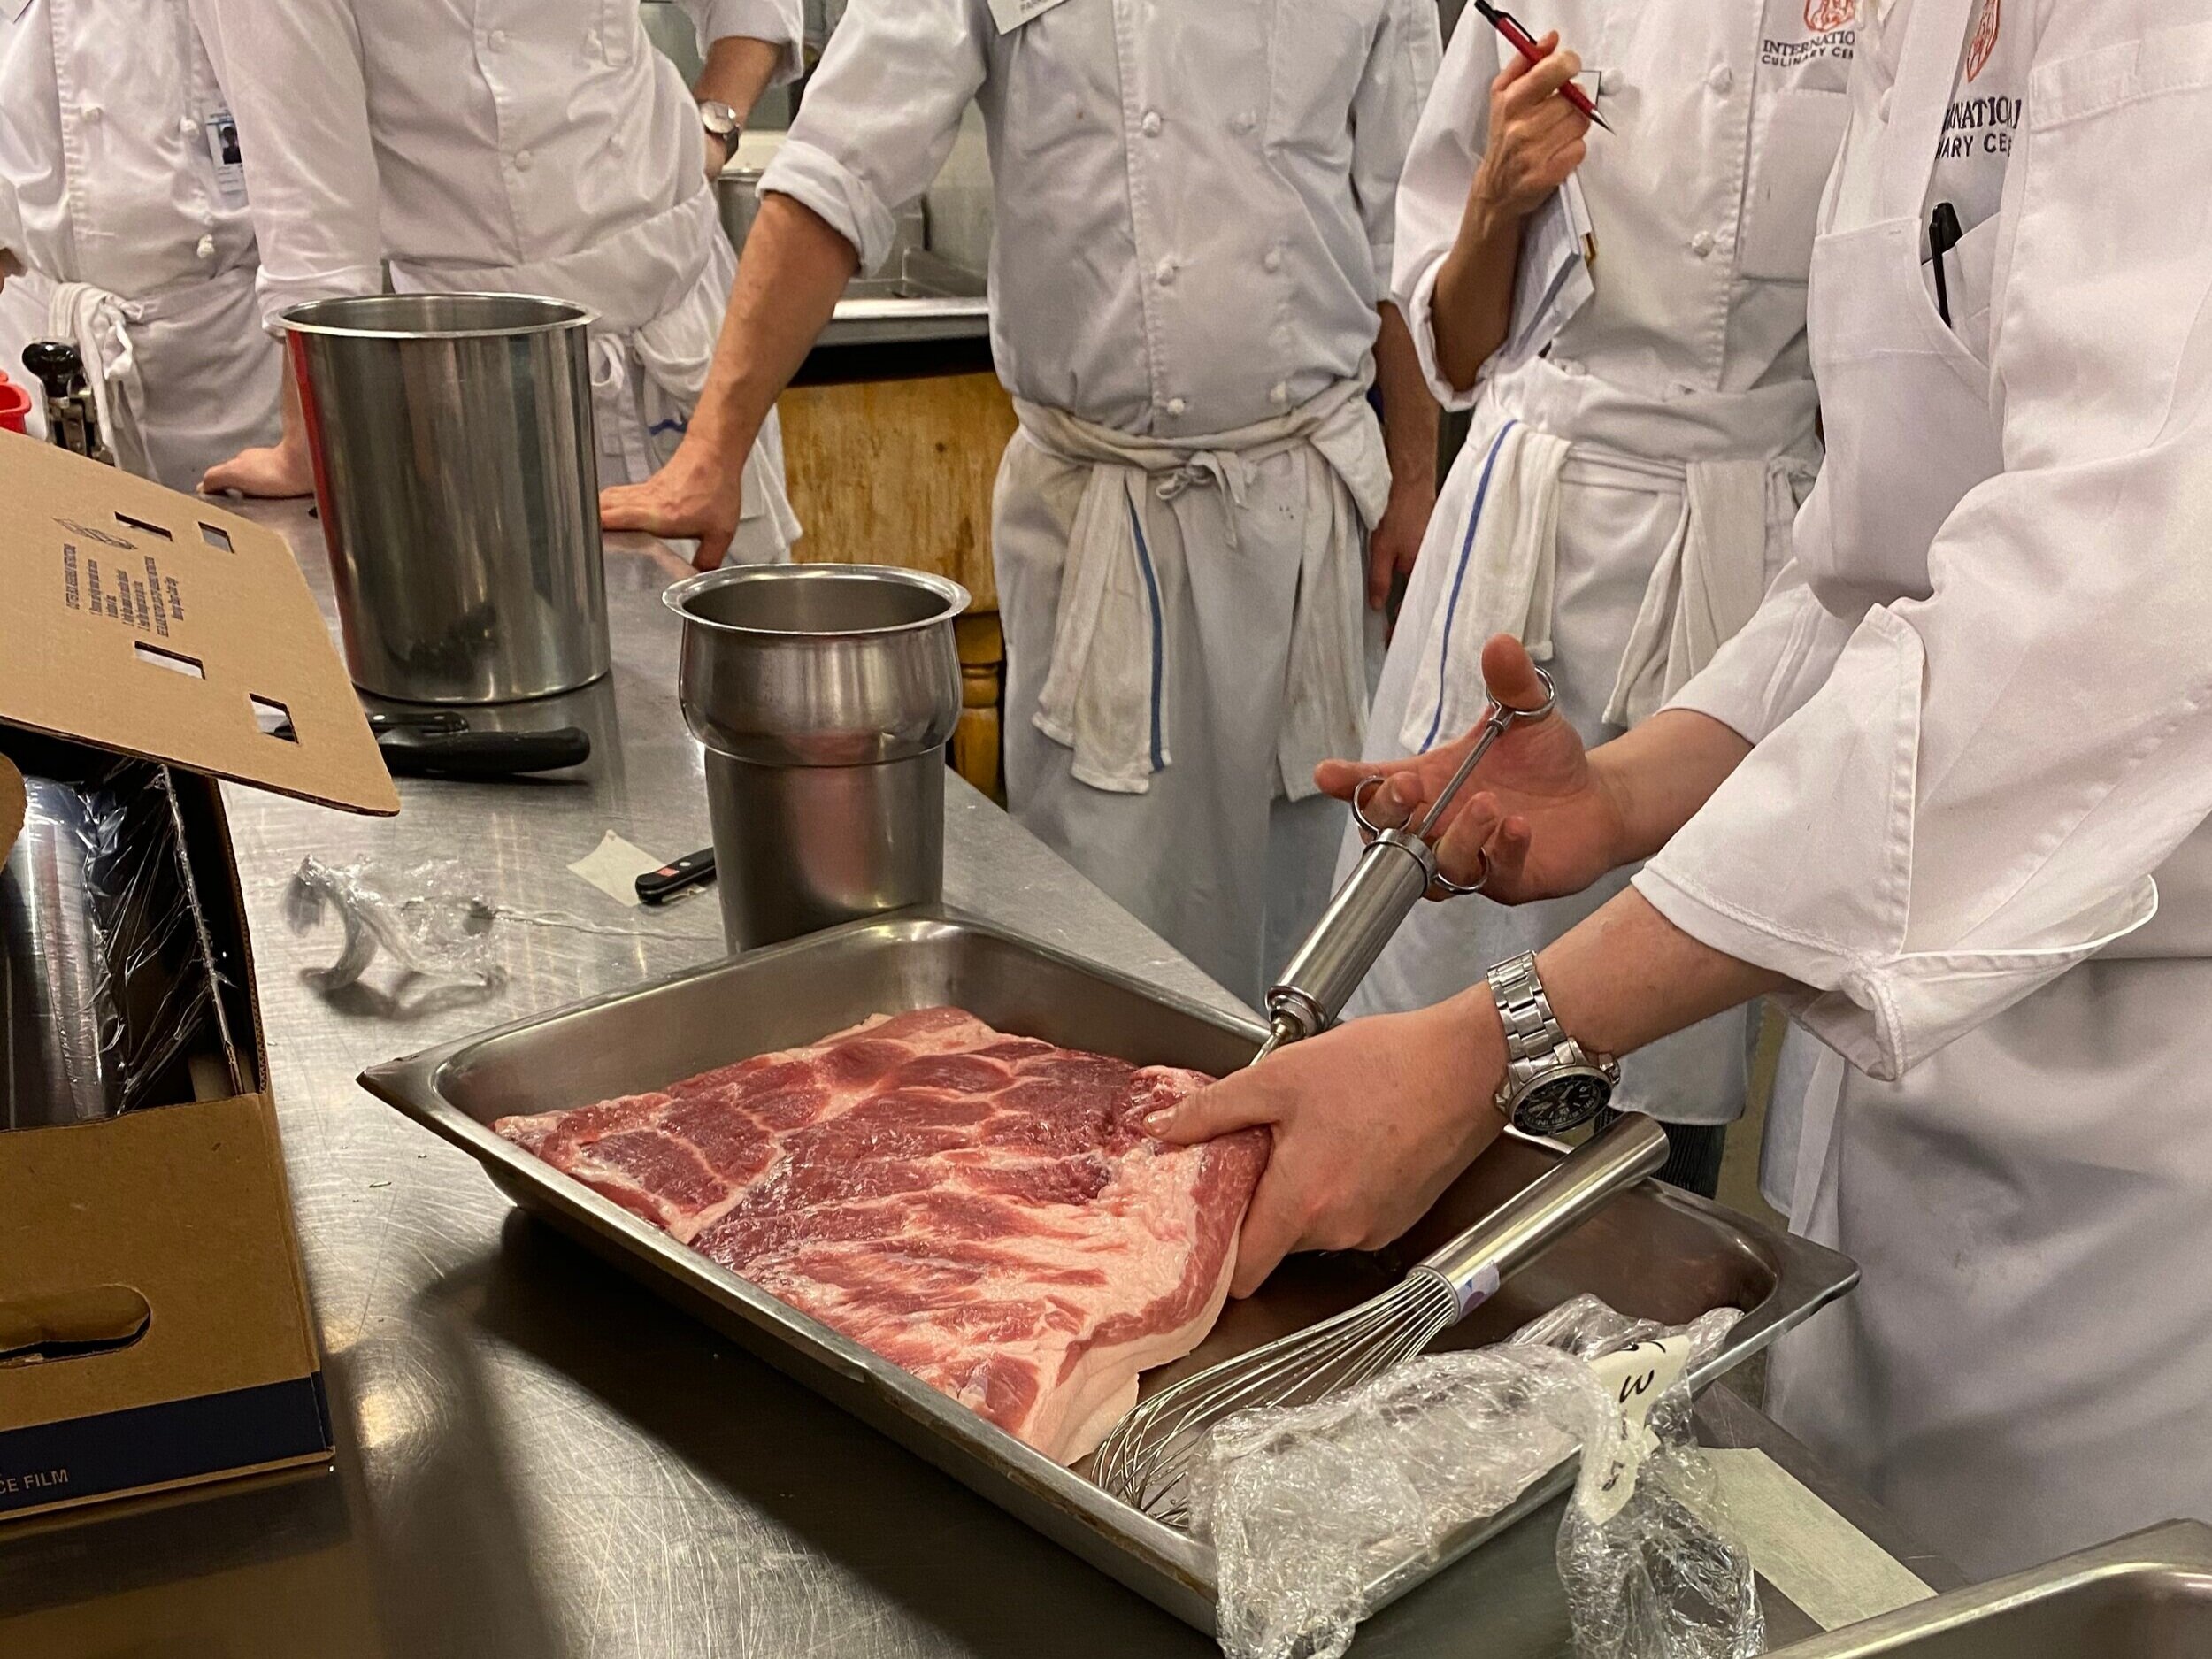
Smoked apple cider venison

My last meat manifestation was appropriately symmetrical with the first demo I witnessed — remember the bacon facial? This time, I used the same hypodermic needle to inject a hunk of venison with an apple cider based brine that was enhanced with curing salts and other seasonings. It ended up being a delightful flavor combination, since game meats go well with many fruits, and it didn’t end up being too sweet, especially with the smoky flavor that we overlaid by cold smoking it — just like the lamb sausage. I also used the meat slicer to serve this for the buffet.

After getting squirted in the face, I showed that hypodermic needle who was boss!

This is the type of machine I used to slice the venison. Photo courtesy of WebRestaurantStore.
Summing it all up
So, after all that, was charcuterie worth the strife? My answer: definitely! Again, I’m not sure when I will ever have the chance to make so many creative and specialized foods, with such knowledgable and passionate mentors to boot. Tune in next time to learn about Level 4, when we tied everything together and put our skills to the test!